en
en italiano
 čeština
 Deutsch
 français
 hrvatski
 magyar
 polski
 српски
 русский
 中文
中文 中文
中文 한국어
한국어 español
Understanding boundaries
Understanding boundaries
With the Boundary command, you can designate a specific area of a drawing for operations such as hatching and dimensioning. You create a boundary by selecting an area inside a closed loop. The area you select can be bounded by a single closed entity or by multiple entities that intersect. The resulting boundary can be a polyline or region, if your program version supports working with regions.
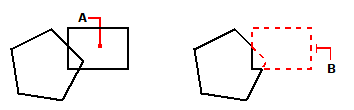
In cases where entities intersect, progeCAD interprets the boundary as the closed loop closest to the point specifying the area. In the following figure, for example, the area point selected in the rectangle results in a boundary consisting of the closed loop nearest the point selection, as opposed to the closed loop formed by the rectangle itself.
|
|
|
|
|
Selected point (A) and resulting boundary (B). |
||
To make boundaries more specific, you can create a boundary set. A boundary set specifies which entities are considered in determining the boundary path. This can make creating the boundary faster if you are working with a complex drawing.
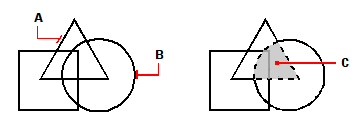
In the following figure, the circle and triangle are the selected entities. If you select an area anywhere inside the circle or the triangle, the result is a polyline (or region if your program version supports regions) that bounds the shaded area.
|
|
||
|
Selected entities (A and B) and the point specified in the selected area (C), which results in a new boundary around the shaded area. |