Drawing helices
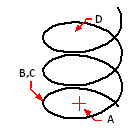
A helix is a three-dimensional spiral that is open at both ends. The base and top can be equal values, similar to a coil or spring, or they can be different values, similar to a cone.
Helices are often used to create other entities.
In particular, the Sweep, Loft, and Revolve commands can all be used with helices in more complex drawings to create spiral stairs, spiral parts, and more.
To draw a helix
1 Do one of the following to choose Helix ( ):
):
On the ribbon, choose Draw > Helix (in Draw) or Draw 3D > Helix (in Curves).
On the menu, choose Draw > Helix.
On the Draw toolbar, click the Helix tool.
Type helix and then press Enter.
2 Specify the center point of the helix.
3 Specify the radius (or diameter) of the bottom of the helix.
4 Specify the radius (or diameter) of the top of the helix.
5 Optionally set any of the following:
Turns Specify the number of full turns. The default number of turns is three. The maximum is 500.
Turn height Specify the height of one full turn, which updates the number of turns automatically. This option is available only if you have not specified a number of turns.
Twist Specify the direction of helix turns: clockwise (CW) or counterclockwise (CCW).
6 Specify the height and position of the helix by choosing one of the following:
Choose Axis endpoint and specify the endpoint of the helix, which determines the position and direction of the helix.
Specify the height of the helix. If the height is zero, the helix will be a two-dimensional spiral, but if the start and end radius are the same it will look like a circle.
|
|
|
|
|
Helix center point (A), bottom radius (B), top radius (C), and height (D). |
||

 en
en italiano
 čeština
 Deutsch
 français
 hrvatski
 magyar
 polski
 српски
 русский
 中文
中文 中文
中文 한국어
한국어 español