Parallel snap
Use the Parallel snap to show parallel guides when picking second and subsequent points of new linear entities. Guides display parallel to lines, infinite lines, rays, or linear segments of polylines that you indicate with the cursor.
Turn Orthogonal off before using parallel snapping
On the status bar, click Orthogonal On/Off ( ) or press F8 to turn it off or on.
To set the Parallel snap
Do one of the following to choose Parallel ( ):
):
On the ribbon, choose Draw > Parallel (in Entity Snaps).
On the menu, choose Tools > Entity Snaps > Parallel.
On the Entity Snaps toolbar, click the Parallel tool.
Type parallel and then press Enter.
|
|
|
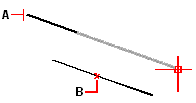
Select the first point of an entity (A), hover over the desired parallel entity (B), then move the cursor back to the new entity to view the guide. |
To draw a parallel linear entity
1 Choose a command, for example, line.
2 Select the entitys first point.
3 Type par and then press Enter.
4 Move the cursor over the desired linear entity. A small x marks the position on the linear entity.
5 Select additional entities if necessary. You can also deselect an entity by moving the cursor over its corresponding x.
6 Move the cursor back to the entity you are creating and use the parallel guide to specify the next point of the entity.

 en
en italiano
 čeština
 Deutsch
 français
 hrvatski
 magyar
 polski
 српски
 русский
 中文
中文 中文
中文 한국어
한국어 español